How to proceed with requirement definition and method design
BackWhen using this tool, there are no rules about where to start. However, I think the natural way to proceed is as follows.
- Only requirement setting is required first.
1. Clarify the purpose of realizing the idea:
For keeping the motivation to create your application, it is necessary to keep always clarifying the requirements purpose including the application name.
Requirement name Setting
- Set the requirement name and application name, and clarify your motivation to impolement and the purpose of the requirement
- Example: Requirement name EC site service (EC_site_Shopping)
2. Create a target list:
This is the process of clarifying the necessary resources as targets for the application.
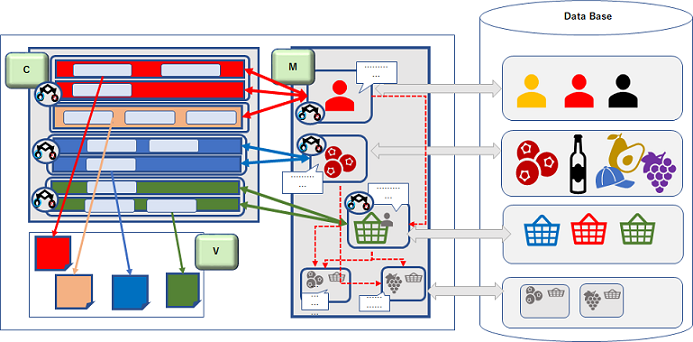
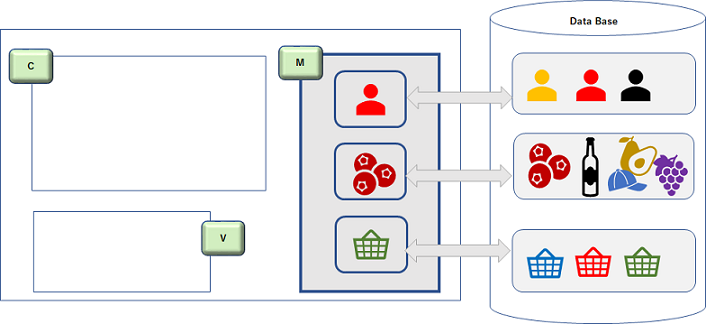
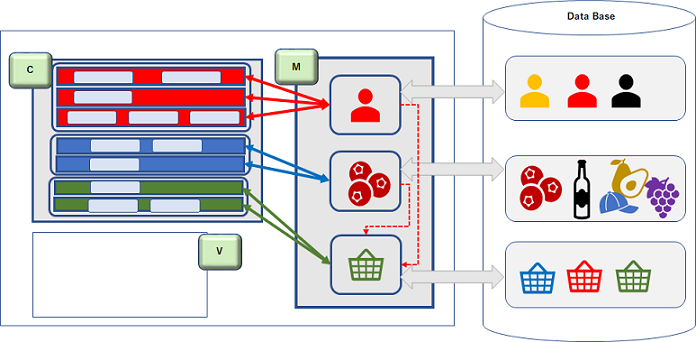
Recognize and regiter targets (create model)
- Identify nessesary appearers (actors and props) on the stage to realize the requirements(Here, it's good only those that directly came up with you)
- Example: product, customer, person in charge
- In some cases, common accompanying items attached to appearers are made independent as one target (for example, image target that collectively handle images attached to multiple targets)
- The target is equivalent to creating a model (M) of the MVC style.
- ER diagram that expresses the relationship between targets is automatically generated based on the target's settings.
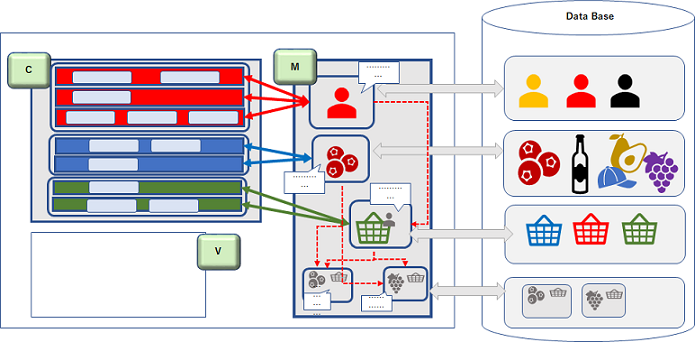
Think about targets acommanied by procedures
If there is a procedural relationship between two targets picked up, there is a new target corresponding to that relationship. It is a good idea to register as soon as you become aware of it. You can remove or add more later.
When there are two targets, for example, a customer and a sales site, there is a procedure called order between them, and a target called order is required. Also, if a target of order involves a procedure for selecting multiple products, then order products (order details) is required for each product's.
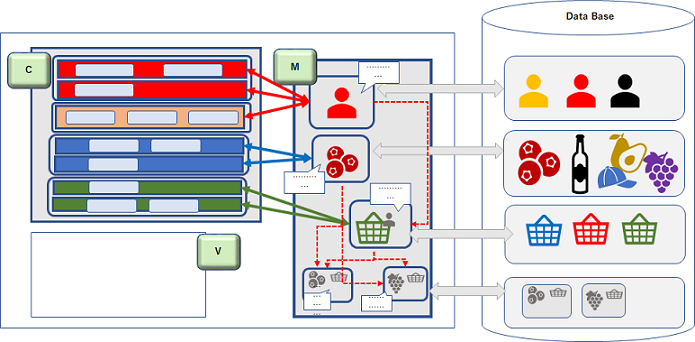
3. Create a feature list:
It's a process of figuring out whatever functionality your application needs.
Register possible features (examine features)
- Register without worrying about the order of features or the level of the feature. The important is to cover what functionality is needed. You can separate or group a large and a small feature later.
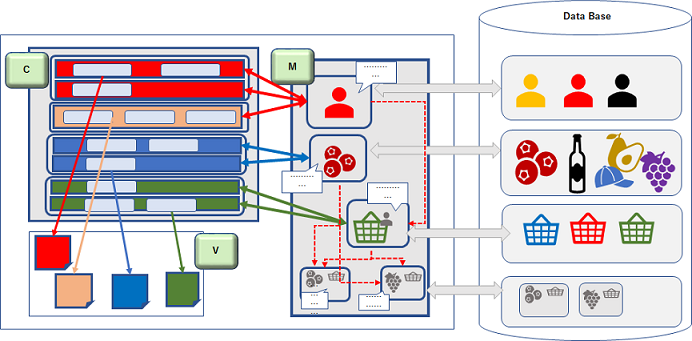
4. Associate each feature with a relevant target:
This is the process of selecting and linking the corresponding target by editing each feature in the feature list.
Associate targets in editing the created feature
- Assign a main target to a feature. (The main target means the target that the feature deals primarily with.)
- How to choose the main target of a feature? (When asking who deals with what in a feature , if who and what are different, then what is the main target.)
- When there are multiple items to handle, which one should be selected as the main target? (Things that occur incidentally to a certain target are called sub-targets. In other words, the origin target directly related the feature becomes the main target.)
- Targets other than the main target are sub targets.
- Sub1(sub target 1) occurs acompanied to the main target.
- Sub2(sub target 2) occurs acompanied to the Sub1 target.
- If there is a mistake in the associated target or there is a shortage, add or delete it by editing again.
- Some original targets change the role depending on the process of feature. In that case, it is important to newly register and associate an appropriate target. This is a new target might be generated by the procedure as described in 2. Create a target list.
- Example: If it is a product order, the ordered product will be the ordered product associated with the customer. Therefore, order products should be treated separately from their original product targets. An order product can also be described as an order detail associated with an order.
- Example: The order products will be the shipping products linked to the person in charge and the shipping date by being handled by the person in charge. Therefore, the shipping products must also be differentiated. If the shipments for a single order are always collectly shipped, you can also deal with them as a shipping target.
- Example: A person target becomes a user by logging in, and becomes a customer by placing an order on the EC site. it also becomes a person in charge by the role that deals with shipping.
- When the target is not particularly clear, such as a home reference feature, it is a good idea to specify the application (System) target that is generated by default.
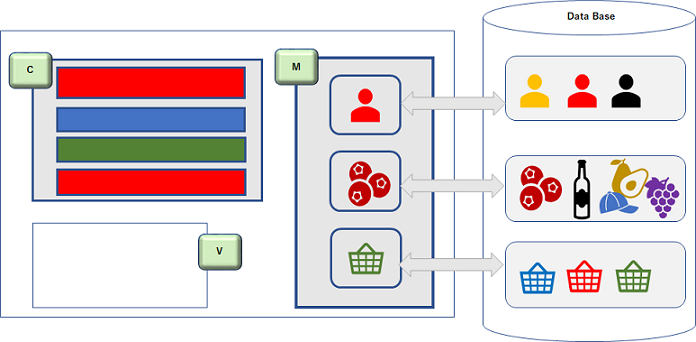
5. Group each feature around its target:
The process of grouping based on the main target associated with each feature.
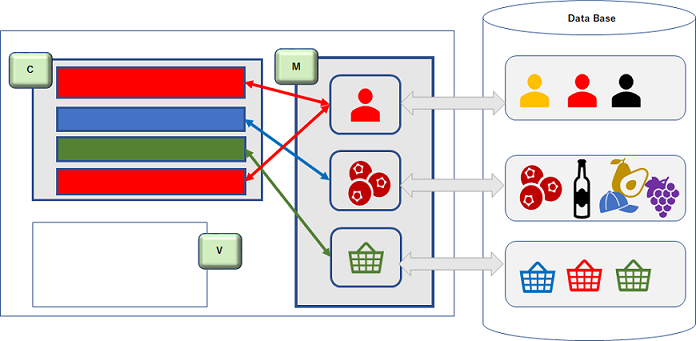
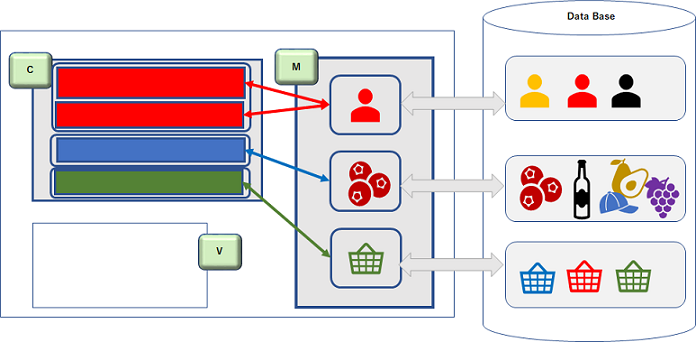
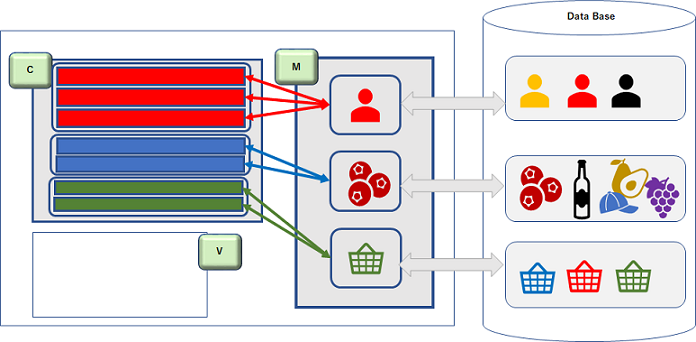
Grouping the list of features ( grouping features equivalents to Creating a controller. This task is very important.)
- It is important to properly link the main target for the feature. Grouped around this main target. Features that do not specify a main target are not grouped.
- Grouping results in creating a group of features that performs operations on a main target. Grouping has a very important meaning, and each group corresponds to a controller in the MVC style.
- Grouping can be partially changed at any time, partially according to your needs.
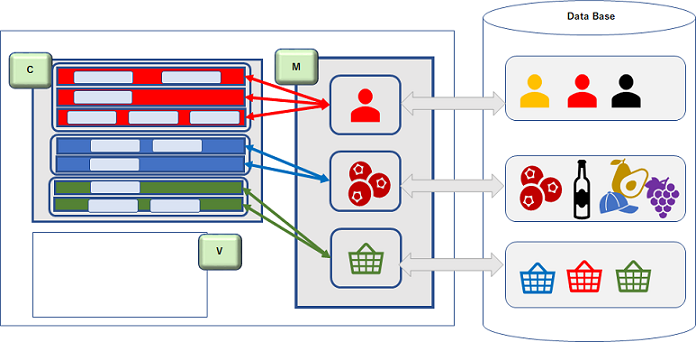
6. Break down each feature by CRUDI:
It is the process of validating each grouped feature against CRUDI (Create, Read, Update, Delete, Index(list)) criteria and subdivide it if necessary.
Specify CRUDI in feature details (Verify feature by specifying CRUDI)
- Organize missing features based on CRUDI. However, if you specify multiple CRUDIs for one feature, they will be automatically divided into each by the action generate operation.
- Create: C, Update: U, Delete: D, Read: R, Index(list): I
- Feel free to add missing functions based on CRUDI. Additional features can be incorporated into the existing group by grouping them with the appropriate main target.
7. Generate action:
Auto-generate standard action steps required when performing a feature.
Assign actions (automatically generate standard actions)
- For each feature, it is possible to automatically assign actions based on CRUDI criteria for those with CRUDI designations. You can do it all together or individually.
- If multiple CRUDIs are assigned to one feature, they will be divided into each feature, so organize them appropriately according to each CRUDI.
- Actions are automatically generated according to rules. Duplicate action names in the same group must be adjusted, including changing the action name, so that they do not overlap.
8. Create relationships between targets:
It is the process of making mutual connections between individual targets, and of parent-child relationships being explicit. This work forms an important relationship diagram for creating the database.
Set the relationships between targets and create an ER diagram (It is extremely important to organize the relationships of the targets. The ER diagram is automatically generated.)
- Organize the parent-child relationships of already created targets. Arrangement of this relation greatly influences the construction of the database.
- Example: When a customer places an order, there is a relationship with the order product, and that relationship can be multiple order products for one customer (one-to-many relationship).
- Example: One product can be ordered by multiple customers, so there is a relationship between one product and multiple order products (one-to-many relationship)
- When you set a parent-child relationship between two targets, the parent target's ID is automatically set as a foreign key for the child target.
- STI inheritance, polymorphic relationships can be set as needed.
- Example: To inherit the user and make the customer and the person in charge an STI relationship, specify the inheritance source of the customer and the person in charge as the user.
- Example: A polymorphic relationship associates an image target through a virtual parent to a product, user, etc. that needs the image. At this time, the parent target (product, user, etc.) associates the virtual parent as a child. The virtual parent is deleted when you delete the child side association that you set, and the relationship with the related parent is also deleted.
- You don't have to force the target relationship if you don't need it.
- Example: Even if the data of a product inventory is updated by a specific person, if there is no need to link the person to the product inventory, no relationship setting is required.
- ER diagrams are automatically generated by setting relationships between targets.
9. Organize target attributes:
Register the required attributes of each target and reflect them in the ER diagram.
Set target attributes and refine ER diagram
- By creating a target and establishing relationships between targets, the ID attribute that is the primary key of the target, the creation date, the update date that are required as standard, and the foreign key attribute of the parent reference are automatically set.
- Add any required attributes that are not automatically generated. However, in a parent-child relationship, the same attribute as that of the parent should be not set for the child. A smart relationship is that the parent's attribute can be obtained by referencing the parent with an attribute called a foreign key. Eliminate duplication of parent-child attributes (one of 'target' attributes normalization).
- Target attributes should be set with appropriate names to avoid duplication for each target.
- Example: If each target requires an attribute called 'name', it is smart to use the same 'name' for each.
- Attributes required for Polymorphic relationships and STI inheritance are automatically set (Polymorphic and STI can be ignored if not necessary.)
- The set attributes are automatically incorporated into the entity when the ER diagram is generated.
think and normalize the process (this is very important)
Thinking about processes (procedures) requires new targets. At that time,if there are duplications in the attributes of the actual data represented by the target, it is necessary to separate the common attributes of the target and make them into one parent target. This work is equivalent to normalizing the target attributes. This is a very important work for effective database management. It is not necessary if it has already been taken into account when creating targets and registering attributes.
- Example: Order products generated by the process of purchasing products, if different products are ordered at the same time, attribute values other than those related to products, such as the same order date, will be duplicated. In this case, the common attributes of the same order are separated as a target called order, and the order and the order product are linked in a parent-child relationship (one-to-many relationship).
- Old: Customer → Product → Order products
- New: Customer → Product → Order - Order products (one to many)
10. Readjust actions:
As a result of target normalization, group readjustment, etc., the final action must be adjusted.
readjust actions
- Action names must be unique within a group. Therefore, change one of the duplicate action names to the appropriate action name.
- Duplicate actions in each group are clearly marked as duplicates by color.
- If there are many duplicate actions in the group, splitting the group is one way.
- Example: Login, logout, etc. should be grouped as an authentication group. In that case, you can create a group called authentication to separate it (creating a target called authentication just for grouping is not realistic).
Description of actions within the group
- Organize the descriptions of individual default-generated actions to be more specific and appropriate. This is to clarify the handling of the actual action.
11. Organize user interface (UI) frames associated with each feature:
This is the process of organizing the screen (rough framework) calling each feature and displayed as a result of the feature.
Create a UI in the user interface list and associate it with a feature action (organize UIs)
- Set common layout (think header, footer, right side display, left side display configuration)
- Register the user interface (screen for user) used (called) for each feature.
- Individual UI settings are currently represented by screen name only.
- Think of UI as a screen called from a specific action. Therefore, the action linked specifies the action that calls that UI screen.
- UI screen creation is equivalent to the view of the MVC style. Views are now registered to specify their relationship to features/actions.
12. Organize the necessary conditions for each functional group action and each target (model):
This is the process of sorting out the conditions for whether or not to execute actions in each feature group, and the conditions for processing for the target(model). Clarifying the requirements for performing each action and processing each target(model) will make the process of creating your application smoother.
Set group conditions: Set action conditions from group details
- Set any necessary conditions for executing actions within the group (equivalent to the controller).
- Set the necessary conditions for actions within the group
- Pre-processing conditions (preconditions for executing actions)
- Post-processing conditions (conditions for incidental processing after action execution)
- Link by assigning the corresponding action to the condition
Set model conditions: Set model conditions in the target details
Set the conditions to be verified for the model (target) before and after CRUDI processing.
- Validation (Conditions for checking validity of input data)
- Filtering conditions (data search conditions)
- Preprocessing for registration/update/deletion
- Post-processing of registration/update/deletion
- Other necessary processing